Introduction
git and GitHub have revolutionized not only how I do development, but how we developers share code.
I have two tools I need to do software development: an editor and version control.
The Pragmatic Programmer advocates you should know your editor inside and out. So why don't you know your version control system just as well?
Hello everyone, today I am demonstrating a little new feature of GITHub that everyone must know about and that feature is git add patch mode.
Now I know you are familiar with >git add the command that takes an entire file and adds it to the staging area, allowing it to be the part of your commit.
But patch mode is a way to stage only parts of the change file instead of the entire one.
Patch mode using git add -p allows you to stage parts of a changed file, instead of the entire file. This allows you to make concise, well-crafted commits that make for an easier to read history.
Since I learned about it a month or so ago, patch mode has taken my git usage to another level. It's one of the most powerful git commands, right up there with rebasing, but much less dangerous!
So, let say you make two distinct changes to a file becomes time to commit those changes but they are related to each other at all. For example you added some new functionality near the top of the file and also made some small formatting change to unrelated part near the bottom of the file. Let's say you are in a hurry and just commit the file you have right away.
>git add myfile Command Explaination
>git commit -m "commit message" Command Explaination
or
>git commit -a -m "commit message" Command Explaination
and
>git push -u origin master Command Explaination
So you have pushed the new functionality out the production. Until later your boss calls and that's new feature causing some measure problems and need to be removed right away. You use the command:
>git revert Command Explaination
to undo the changes but one of your commit had code for this new feature and also contains some unrelated syntax changes, so you end up undoing both the new feature and the syntax changes because they are part of the same commit.
You want to those syntax changes stay in the code base but you can't do much about it and you are in a hurry and stuff are in the same commit. If only you had known about and taking time to use git add patch mode you could have stage the commit to those two changes in sets of separate commits, so later if and when the time comes one you didn't have to also revert back the other.
So, none of us required to crack the extra effort to keep the required changes and also give us a cleaner commit history.
So patch mode, let's get down to it:
STEP 1
Move to your current working repository and check the status of the project by using:
>git status Command Explaination
If there are no changes to commit yet than first make some changes and then check the status again (as shown in figure).

See here we have changes to commit in the file config.yml
Step 2
Use below git command to check what has changed in the file:
>git diff Command Explaination
Here you will get all the changes that you have made to the file:

STEP 3
Now it's time to use patch mode. Use following command:
>git add -p Command Explaination
GITHub patch mode will start out by cycling threw all of the hunks that are in our code.
Hunk is a intelligently derived block of code that get things as related to one another (not necessarily related).
Well, GIT split out your hunks based on white space (see the figure):
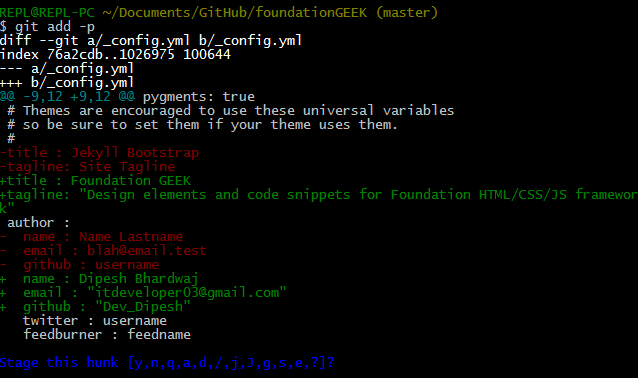
See we have list of different commands at the bottom of the screen, that we can start using in step 4.
STEP 4
In last step we have received a command with list of options in it, in order to know what all of those commands actually does just type ? and hit enter. And see you have a full help list associated with each one.
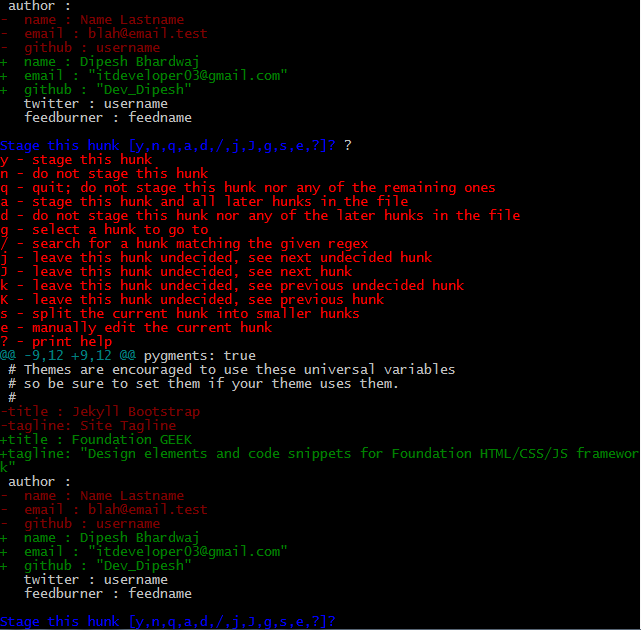
Let list the more useful ones:
-
y- this is stage that particular hunk, i.e. it stage one hunk at a time -
n- skip that hunk and don't stage it -
q- neither stage this hunk nor stage any other in the file. This will let you out of the command -
a- this will stage the current hunk and all the remaining hunks in the file -
d- don't stage any hunk which aren't staged -
g- help you to move to any hunk immediately -
/- this is for searching hunk using regular expressions -
s- this will split one single hunk even further in to more smaller hunks -
e- manually edit the current hunk, mostly useful in larger hunk and most typical to grasp
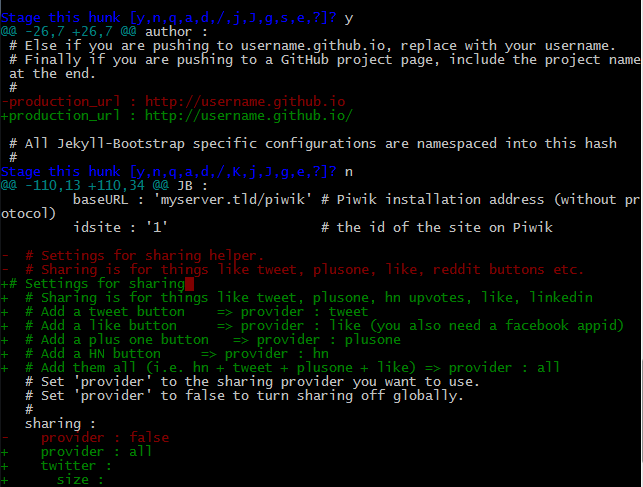
Now let stage the current hunk by using y and use n for all other for now. You can also use q for remaining others but n will help you to learn about how many hunks you have in the file.
STEP 5
Now check the status of your repository again
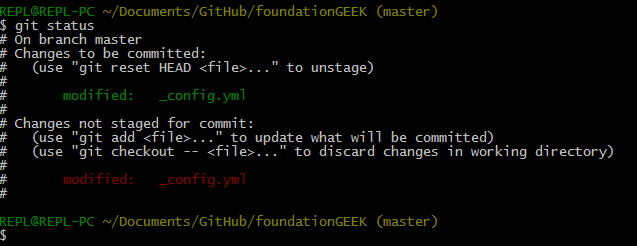
As you can see there are both staged and unstaged changes in the repo. Now use
git diff --cached Command Explaination
to see the cached changes (hunk) which are staged.
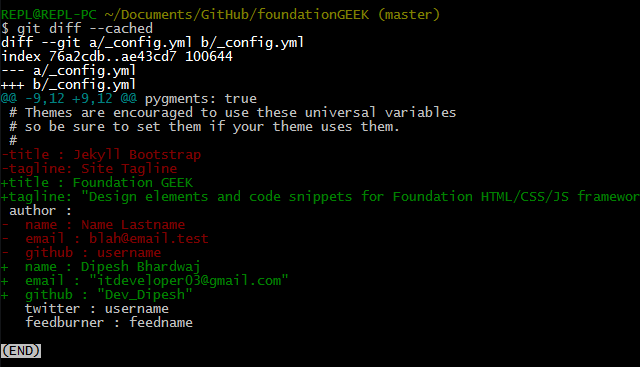
This is how you can commit your changes in different commits and then can push them to the original repository on GITHub. This will also preserve you from reverting both wanted and unwanted changes which are in the same commit without patch mode.
SPLIT HUNKS
Now let see how split s works. See in the figure below we have a big single hunk,
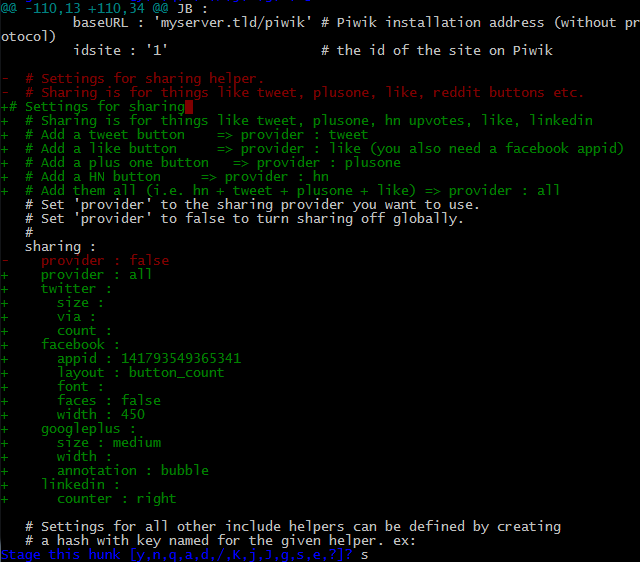
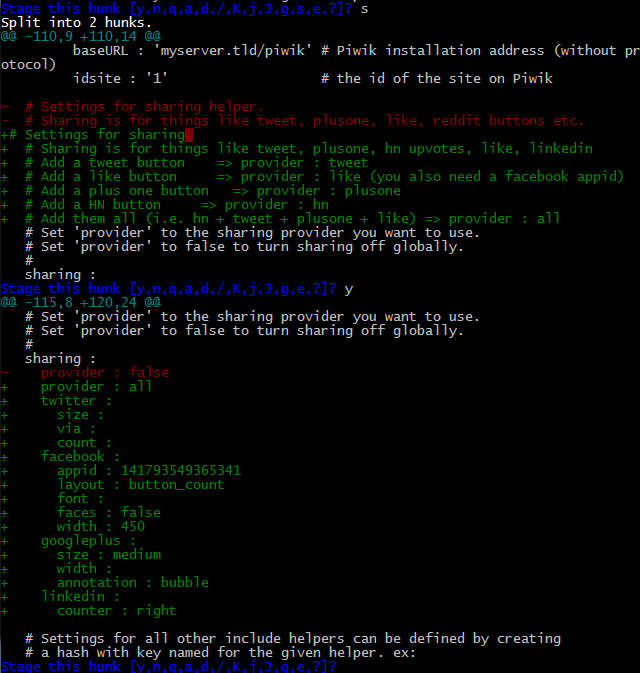
to split it in more smaller hunks just use s. As you can see in the figure below now the earlier hunk is split out into 2 smaller hunks and then you commit them according to your will
EDITING LARGER HUNKS
Here in this section before we proceed any further, update your GIT installation to the latest release, sooner you will know why.
So this time here we have a bigger hunk (see in the figure):
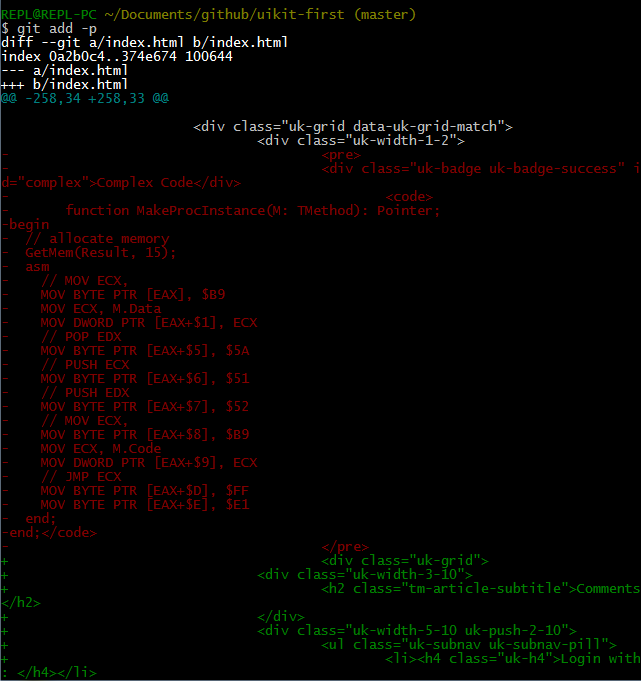
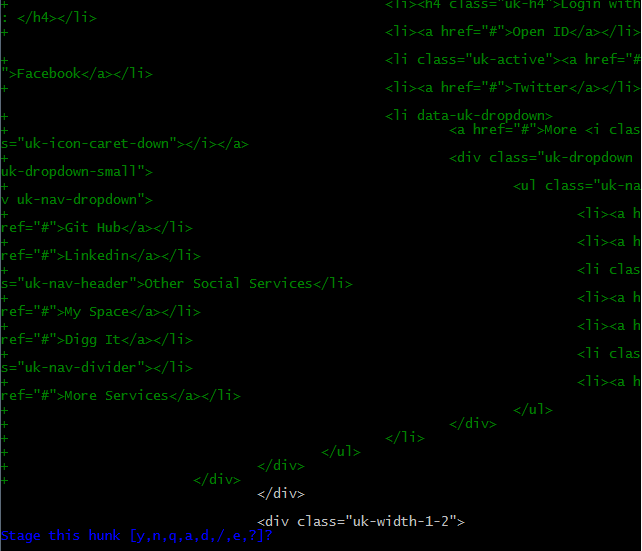
Here now use e to edit the hunk. You see you have totally new interface in front of you, this is where you can edit your hunk.
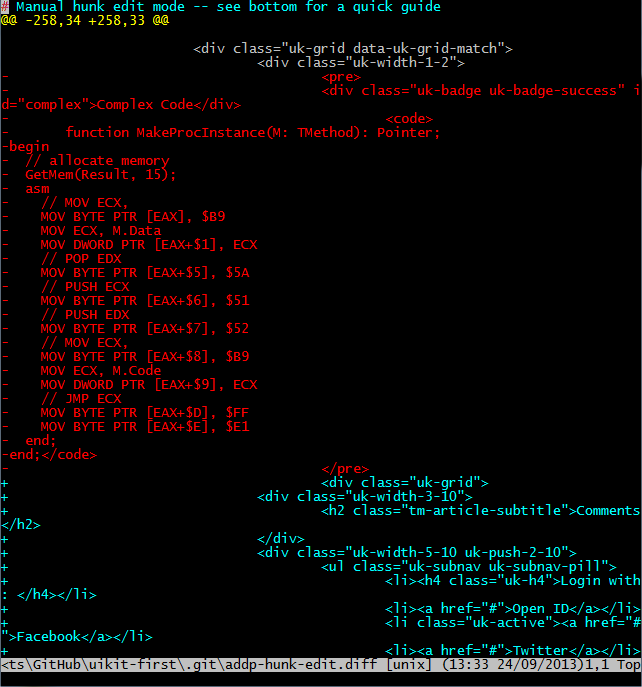
In order to work in this interface effectively you must have the knowledge of Unix vim editor. Don't worry it isn't a rocket science. Here is an online guide to vim editor worth checking:
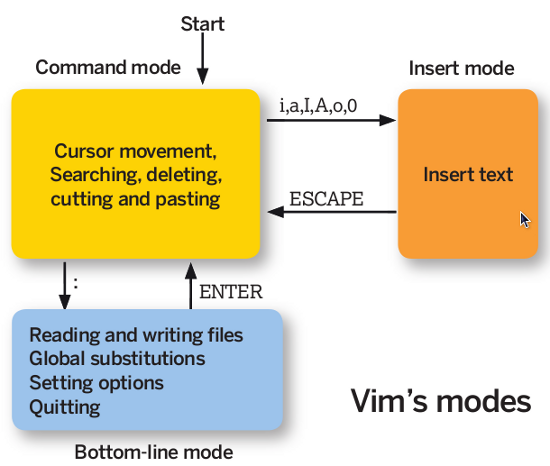
Let me discuss here some basic concepts of vim to understand our further work. Vim has three modes of operations:
- Command mode - where the whole hunk is visible.
- Insert mode - when you press
iorinsert, etc. keys then the command mode will convert in insert mode, i.e. you can edit the hunk. - ex - Command mode or Bottom line mode - this mode permits us to give commands to the editor, once you are in the Insert mode press
Esckey to enter in the command mode.
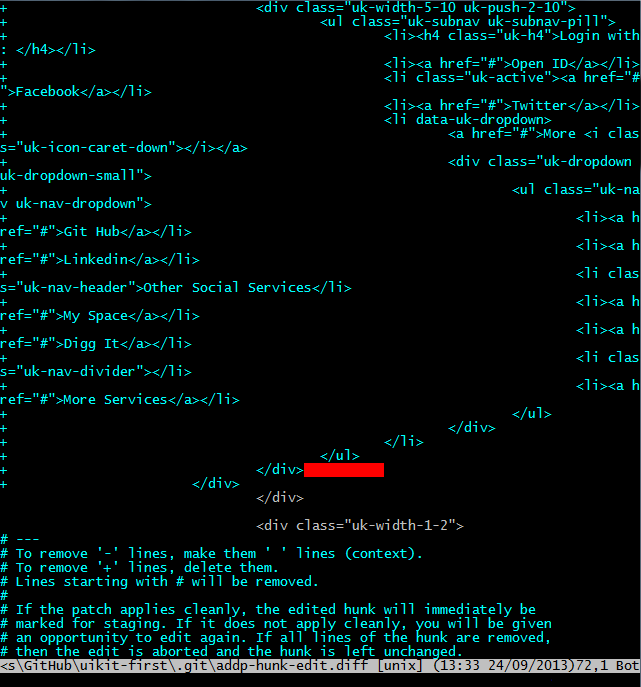
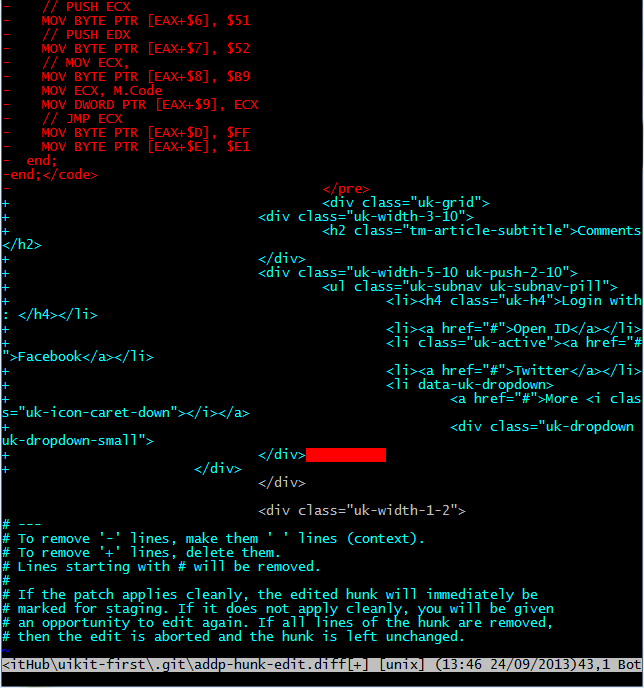
Now let's get back to the subject, in the above hunk there are some text in red and some text in blue. The text in red are those which are removed from the file index.html and the text blue is that one which is added to the file. See in the bottom of the file there are some instructions regarding how to edit hunk.

Check the text in blue carefully, there are two nested <ul> in it. Let remove the inner <ul>. To achieve this simply place the cursor in the beginning of the inner <ul> and then count the number of rows to be deleted (NOTE: Remember to count from 0). Let there are 9 lines to be removed than type:
10d **if you aren't in command mode then press Esc and then type.
(Consider the figure)
after you have made all the changes then in the ex-command mode type
:wq used to save changes and quit
in case if you don't want to save changes then use :q to quit without saving, and to close it forcefully use ! in the end of your command.
After :wq you will get back to your main repository, here now check the status by
`>git status'

Now check the cached diff using
>git diff --cached

Here you can see in our this stage of hunk the inner <ul> is removed.
Now one last point to cover, you remembered in the beginning of this section of the guide I have told you to update your GITHub installation, so here I will tell you why?
Check out this image where we have not edited our hunk yet, there is a line on top of it
@@ -258,34 +258,33 @@

in previous version of GITHub only editing the file won't work and fail by giving
error: patch failed....
error: .....: patch does not apply
you also have to edit the above numbers accordingly. Now what those numbers actually are, let break them down in a list:
- -258 -> The line number in your original file from which the hunk code begins.
- 34 -> Number of lines deleted in the original file.
- 258 -> It represents the line from which lines are added in the original file.
- 33 -> Number of lines added in the original file.
Consider the figure below, it is the original file and the selected code is the one which is visible in the hunk
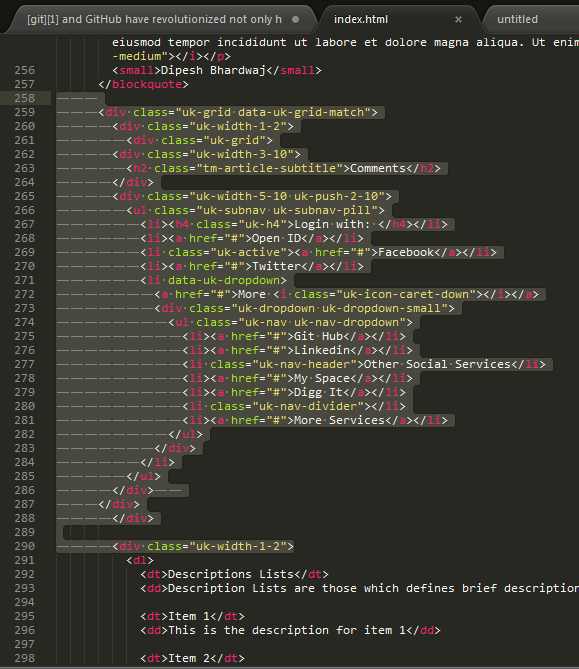
But in the updated version of GITHub you won't need to deal with these numbers. Checkout the hunk image after deleting the <ul>, the numbers in the top line are automatically changed

So, In this tutorial you can how patch mode is a life savior command of GITHub.
If you have any trouble in any of the step then feel free to ask them here and I highly recommend you to get handy with patch mode. Also please comment and share your reviews about this guide.
Other Guides
This is my third extensive guide, you can also fork this guide and my previous guides for future reference (links below):
License
MIT LICENSE - http://dev-dipesh.mit-license.org/